Foxis crappy GPXVisualizer | Created: 19.11.2012 00:28 Last modified: 09.10.2016 11:10 |
I was recently trying to generate static pictures from
GPX tracks for putting into a photo album. However,
all the tools I looked at had some deficits in that
usage mode. For example, gpsprune does have an export
function, but it has a severe limitation: The exported
picture always has the exact same resolution as the
application window, it's essentially an integrated
"screenshot" function. So, I quickly hacked together something on my own in Qt. The resulting source code can be found in this public copy of the GPXVisualizer source code repository. There are currently no binaries available. It can display an arbitrary number of GPX tracks over a few openstreetmap-based maps, and also export static images of that to file with selectable resolution. Here is an example showing some kajaking attempts in Punat bay in croatia over an map background in openstreetmap.de style: ![]() And here is a screenshot: ![]() Update 2016: The URL for the public copy of the source code has been updated. |
|
no comments yet write a new comment:
|
Converting the osm2pgsql planet_osm_nodes table to the new flat-nodes file | Created: 02.09.2012 22:49 |
If you are using osm2pgsql to keep an up-to-date copy
of the relevant parts of the Openstreetmap database, e.g. because
you're running a tile-server, you will be happy to learn that it
has a new "flat-nodes-file" mode. There is a new parameter,
--flat-nodes=FILENAME, that makes osm2pgsql
store the nodes-data it needs to keep (to be able to make
updates from minutely/hourly/daily diffs) into a special
binary file instead of a database table. This is only
recommended for doing full-planet imports/updates, not when
you only have a small region in your database, but in the
full-planet-case the advantages are quite convincing:
Not only does it speed up the processing of diffs, in my
experience between 20 and 30 percent, but it also saves a lot
of disk space. Instead of a postgresql-table that takes up
100 GB on disk, you get a 17 GB file (at the time of writing
this). This also makes it easier to store the file on
a SSD, further speeding up the processing (but even when the
file is on normal spindles the speed-up is significant). However, there is a small problem: You cannot just switch to the flat-nodes mode if you did your initial planet import without it. You would have to start again from a fresh planet-dump import, which can take days, and then you'll have to wait another few days until your database has catched up all the changes that have happened since the last dump. This procedure seemed so undesirable to me that I decided to invest a few minutes of my time to create a tool that allows to convert the database-table to the file. This patch needs to be applied to your osm2pgsql sourcecode-directory. If all goes well, you will then have a new convertnodestabletofile binary at the end of the osm2pgsql buildprocess. This can then be used to convert the database by running something similiar to psql -d osm -q -c 'COPY (select id,lat,lon from planet_osm_nodes order by id asc) TO STDOUT WITH CSV;' | ./convertnodestabletofile /mnt/flatnodes/flatnodes.db Of course, you may need to adapt the database-name after the -d or authentication parameters. This command should take a while, and print some progress information while it goes. After it has run through successfully, you can then test updates with the --flat-nodes=FILENAME parameters. If everything is fine, the last step is to clean up the data in the old postgresql-table that is no longer needed. Note however that (at the time of writing this) osm2pgsql still requires the table to exist, even if it does not use any data from it in flat-nodes mode. The fastest way to clean up is probably to delete the table and create a new empty one, or you can do a delete from planet_osm_nodes followed by an vacuum planet_osm_nodes full. And just as a warning in case this is not obvious: You need to make sure that nothing tries to update the database-table while you convert it, and after you have converted it, you must make sure to NEVER run an update without flat-nodes parameter again, as this wil seriously mess up your database. |
|
no comments yet write a new comment:
|
Sgwd yr Eira and the four waterfalls trail | Created: 10.06.2012 01:17 |
During a recent vacation, I visited the four (water-)falls
trail and the Sgwd yr Eira (Waterfall of the snow). The
Sgwd yr Eira is probably the most famous waterfall in South
Wales, because it is possible to walk behind it. The reason
for this blog post is mostly that before going there,
I tried to google the trail and the waterfall, and I came
up almost blank. Although there are of course some pictures
of the fall and a few descriptions of the walk, I found
all of them very confusing and sort of missing the big
picture. With this post I will try to clear up some of
the confusion. Note however that I do not have detailed
knowledge of the area, I'm writing from my limited
experience. So for starters I made a map. The following map is a openstreetmap.org Export with some additional information added: ![]() And here are some (hopefully) helpful bits of information:
![]() I will not post the picture of me after I walked behind it, but let me assure you that I was really glad that it was a sunny day and thus my clothes dried rather fast... |
|
no comments yet write a new comment:
|
Building my own spice rack in the FAU fablab | Created: 15.02.2012 23:01 Last modified: 08.04.2012 18:00 |
![]() There currently is a Fablab being established at Friedrich-Alexander-University (site is in german, see Wikipedia for an explanation of fablabs in general). Although they're not fully equipped yet, they recently got their laser cutter/engraver. Naturally, such a "toy for big boys" was something I desperately wanted to try out - but I needed a project where I could make use of it. Just doing the usual, cutting and engraving a sign out of a piece of acrylic glass and then lighting it with some LEDs, does certainly look cool, but has been done about a gazillion times already in the week since the laser was delivered. I found it too boring. After a week, I finally had the idea that I needed a spice rack, and while there are certainly better ways to build a spice rack than with parts cut out of acrylic glass, it was not a terribly bad idea. I measured the place where I wanted to put it, and then constructed it so that would exactly fit that spot. I also made the construction so that it would hold together without any glueing. While I intended to make it more stable by glueing, the basic structure would hold without any of it. 5 millimeter thick acrylic glas was to be used, as that would provide the needed stability and ease construction. Turning my construction into reality started off with a few technical difficulties: First of all, I had planned for the rack to be 4 stories and 60 centimeters high. However, the acrylic glas available in the fablab only was 50 centimers long, thus only permitting 49 centimeters of height. The top level thus had to be cut off. The second problem was the software: The lasercutter has a not-so-great windows driver, and usually "Corel Draw" is used to send data to it. I had created my design with "QCAD" (community edition), which saves files in DXF format. Importing those into Corel Draw was absolutely unproblematic. However, when sending it to the cutter, the printer driver created nonsense cuts because it only has two modes for vector sorting. The "inside out" mode (that had to be used because there were holes to be made into the parts before they were cut out) gets confused with the outer border of the part, and randomly cuts individual lines of the outer border. Luckily, corel draw has a function to combine multiple connected lines into one continuous object. That also causes them to be sent to the printer driver as one object, eliminating the problem. Of course, it would be a very useful feature for the printer driver if it could do that internally. After that, cutting the parts went pretty smooth - but problems continued during assembly: The laser currently seems to be a little misaligned, meaning that it does not do cuts through the material at an 90 degrees angle, but more like 80 degrees. Also, the acrylic plates from which I cut have a pretty high tolerance themselves: a "5 millimeters" thick plate is somewhere between 4.1 and 5.9 millimeters in reality. Both these problems meant that I needed to use a lot more force than planned and - in one case - a rasp to get the parts together. On the pro side, after finally putting the parts together, they were really stuck, making the construction rock stable. I still decided to glue the most important parts together as originally planned. I used Dichloromethane for that - it essentially melts the acryl together and should create almost perfect connections. The problem here was that I had read the german Wikipedia article on Dichloromethane - and as a result, I was very very veeeeery cautious with it. In the end, I used way too little, and my "glue points" did not hold. I decided to skip a second attempt - as mentioned, the construction was stable enough without glueing. There was one more FAIL worth mentioning: I had misconstructed the mount points for the bars at the front and the back that prevent the spices from falling out. They were 5 mm too high due to a little miscalculation. Instead of lasering the big side parts again with the mount points in the right places, I just made the bars (which I had not lasered yet) 5 mm larger so they would fit. In the files below, the .cdr file has the wrong mount points and the larger bars. In the .dxf file, the error has been corrected, so bars and mountpoints are as intended, but not as I built it. 
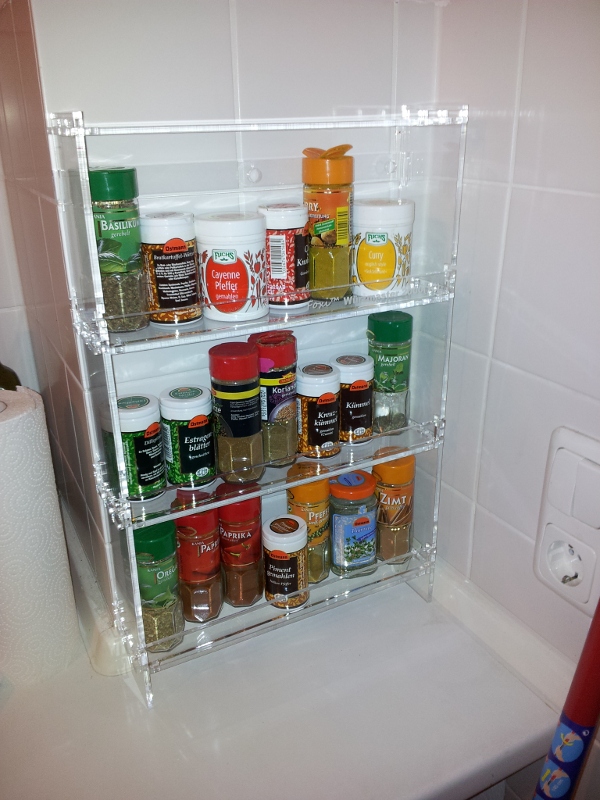
In the meantime, the spice rack is in full operation. Unfortunately, it is too small, I can't fit all my spices in due to it only having 3 instead of 4 floors. I'm still pondering ways to add the missing one. Though I had constructed a bar for screwing it to a wall, that was not done: The construction is attached to the wall only through a Tesa Power Strip that has been cut into two halves. As usual, here is a collection of stuff from the project, in the hope that some of it might be useful for others: [Photos from the construction] [Corel Draw file - this contains what was actually built] [QCAD / .dxf file - what was originally planned] |
|
no comments yet write a new comment:
|